Guide
From first connection to everyday features, step by step.
Most people only need to follow this order. For the harder networking details see Technical & Security, and when something isn't working, check Help separately.
Android setup
For your first Android connection, just follow this order.
This assumes Wi-Fi (the same router). Android needs its Accessibility Service; for Mac, use the separate five-step flow below.
Open the PC app
Run OneMouse on Windows and a 6-digit code and a QR code appear on screen.
Turn on the Android Accessibility Service
To receive mouse and keyboard input from the PC, turn on the OneMouse Accessibility Service on Android.
Search for your PC
Find the PC on the same Wi-Fi (the same router). On Android 13 and up, you may be asked once for the "nearby Wi-Fi devices" permission at this point.
Pair with the QR or 6-digit code
Scan the QR code or enter the 6-digit code to confirm it's your device. Once pairing is done, the input, file, and clipboard channels open.
Set your phone's position
Choose which edge of the PC screen (left, right, top, or bottom) leads to your phone, and arrange it to match the real direction. That edge is where the cursor crosses over.
Cross over and use it
Move the mouse across the arranged edge to use your PC mouse and keyboard on the phone.
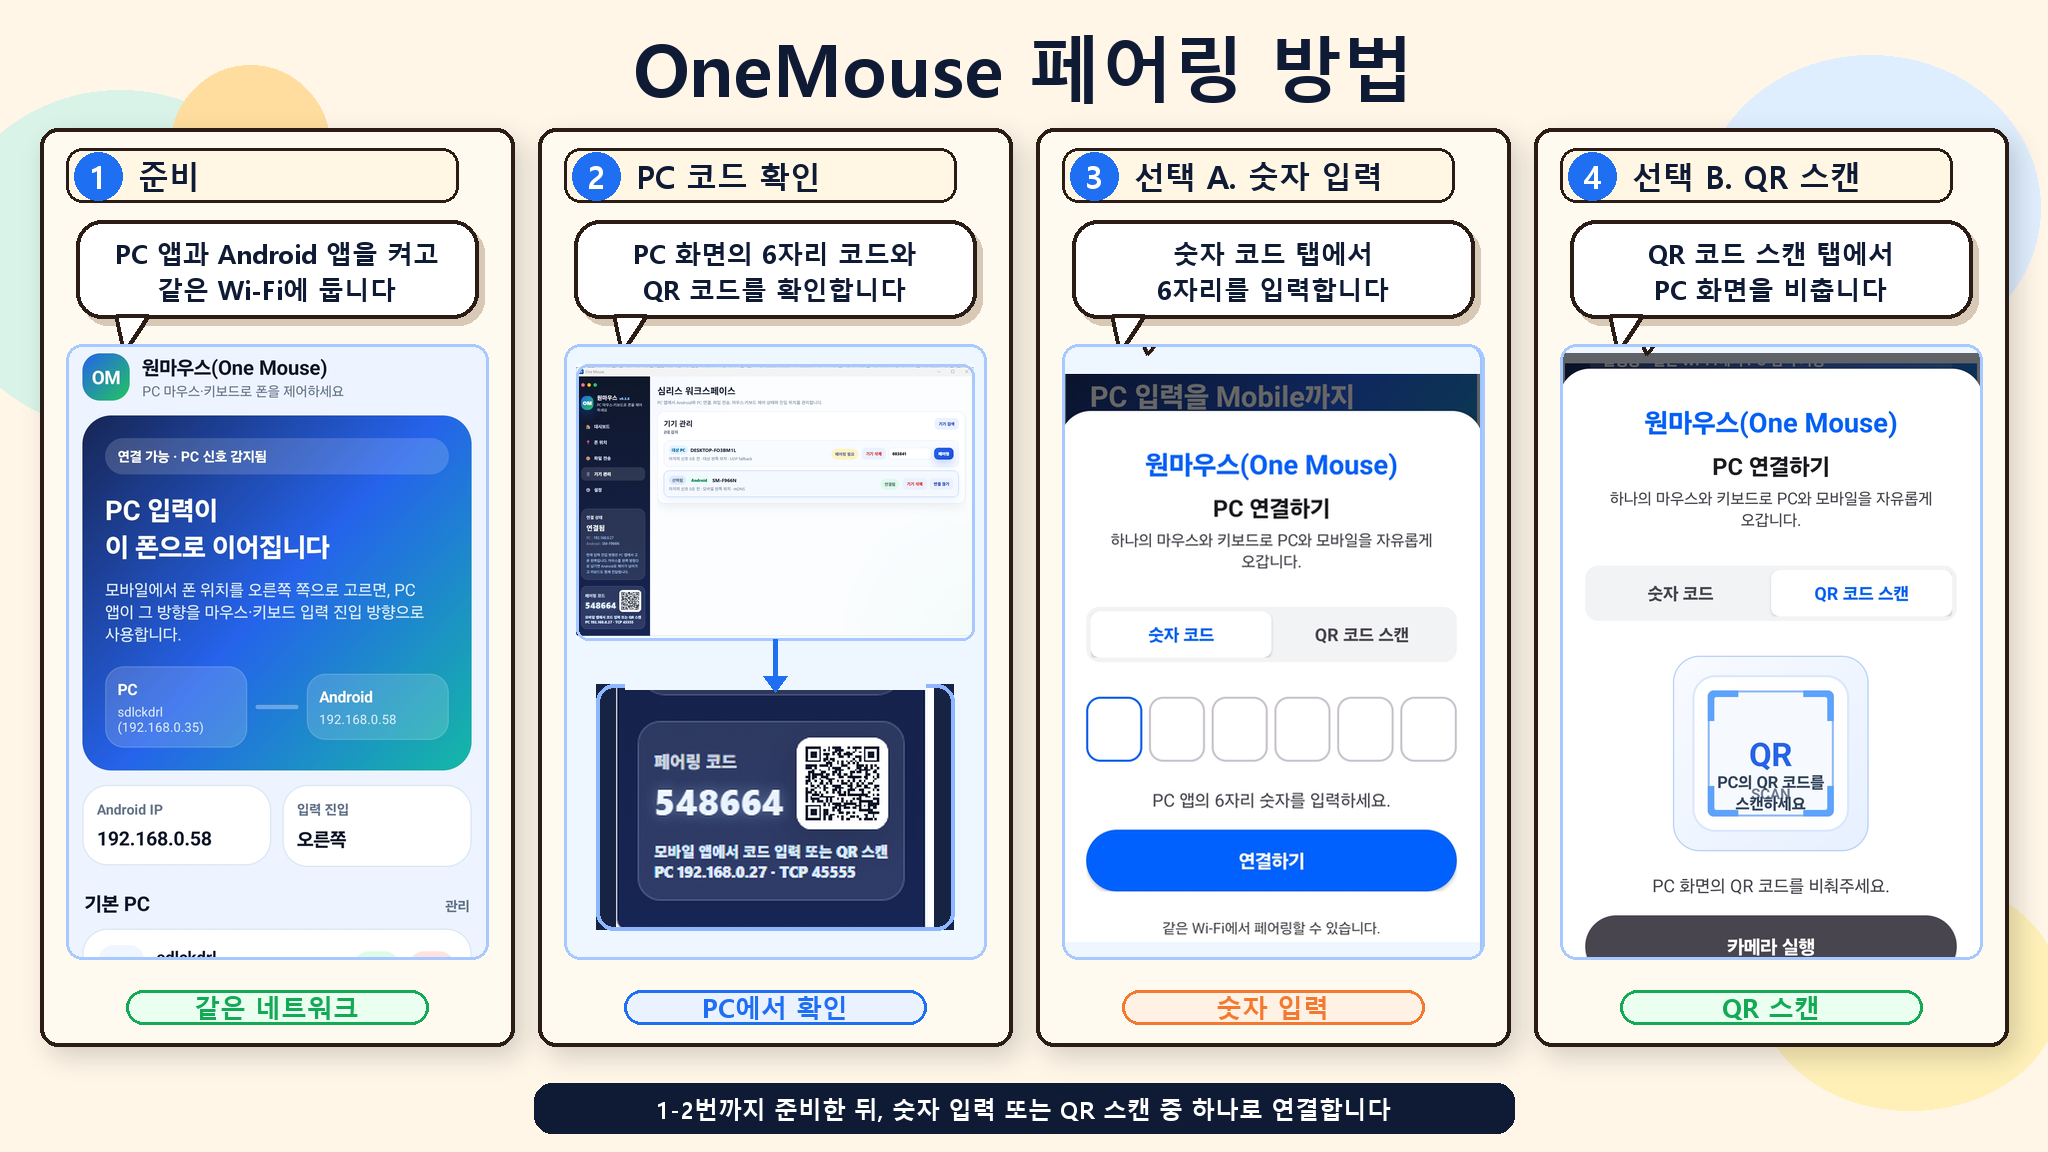
See the real-UI pairing flowGet ready → check the PC code → enter the number → scan the QR
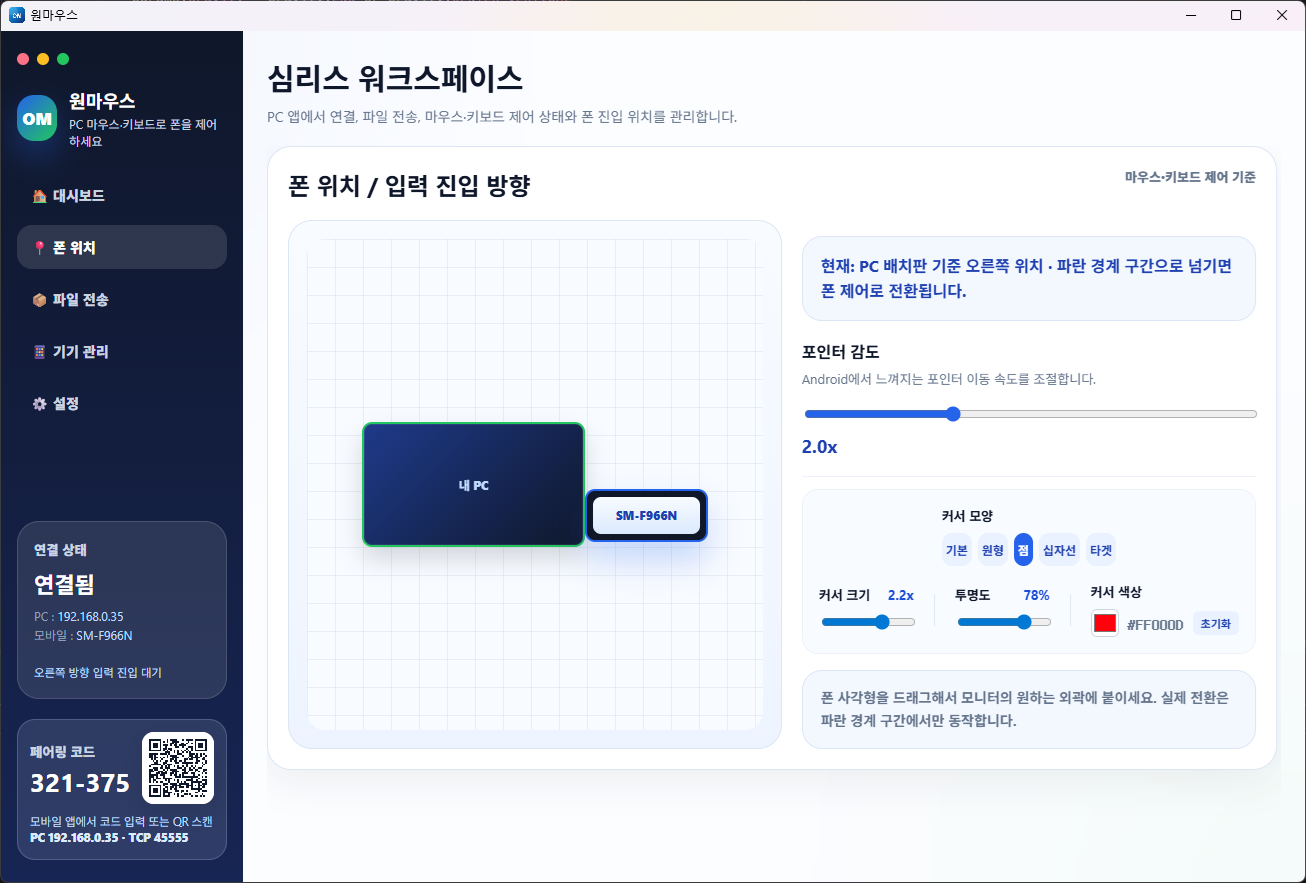
Phone position
After connecting, just match your phone's position to where it really is.
Drag each device to its real position in the arrangement screen. The cursor crosses the corresponding edge.
See the arrangement screen
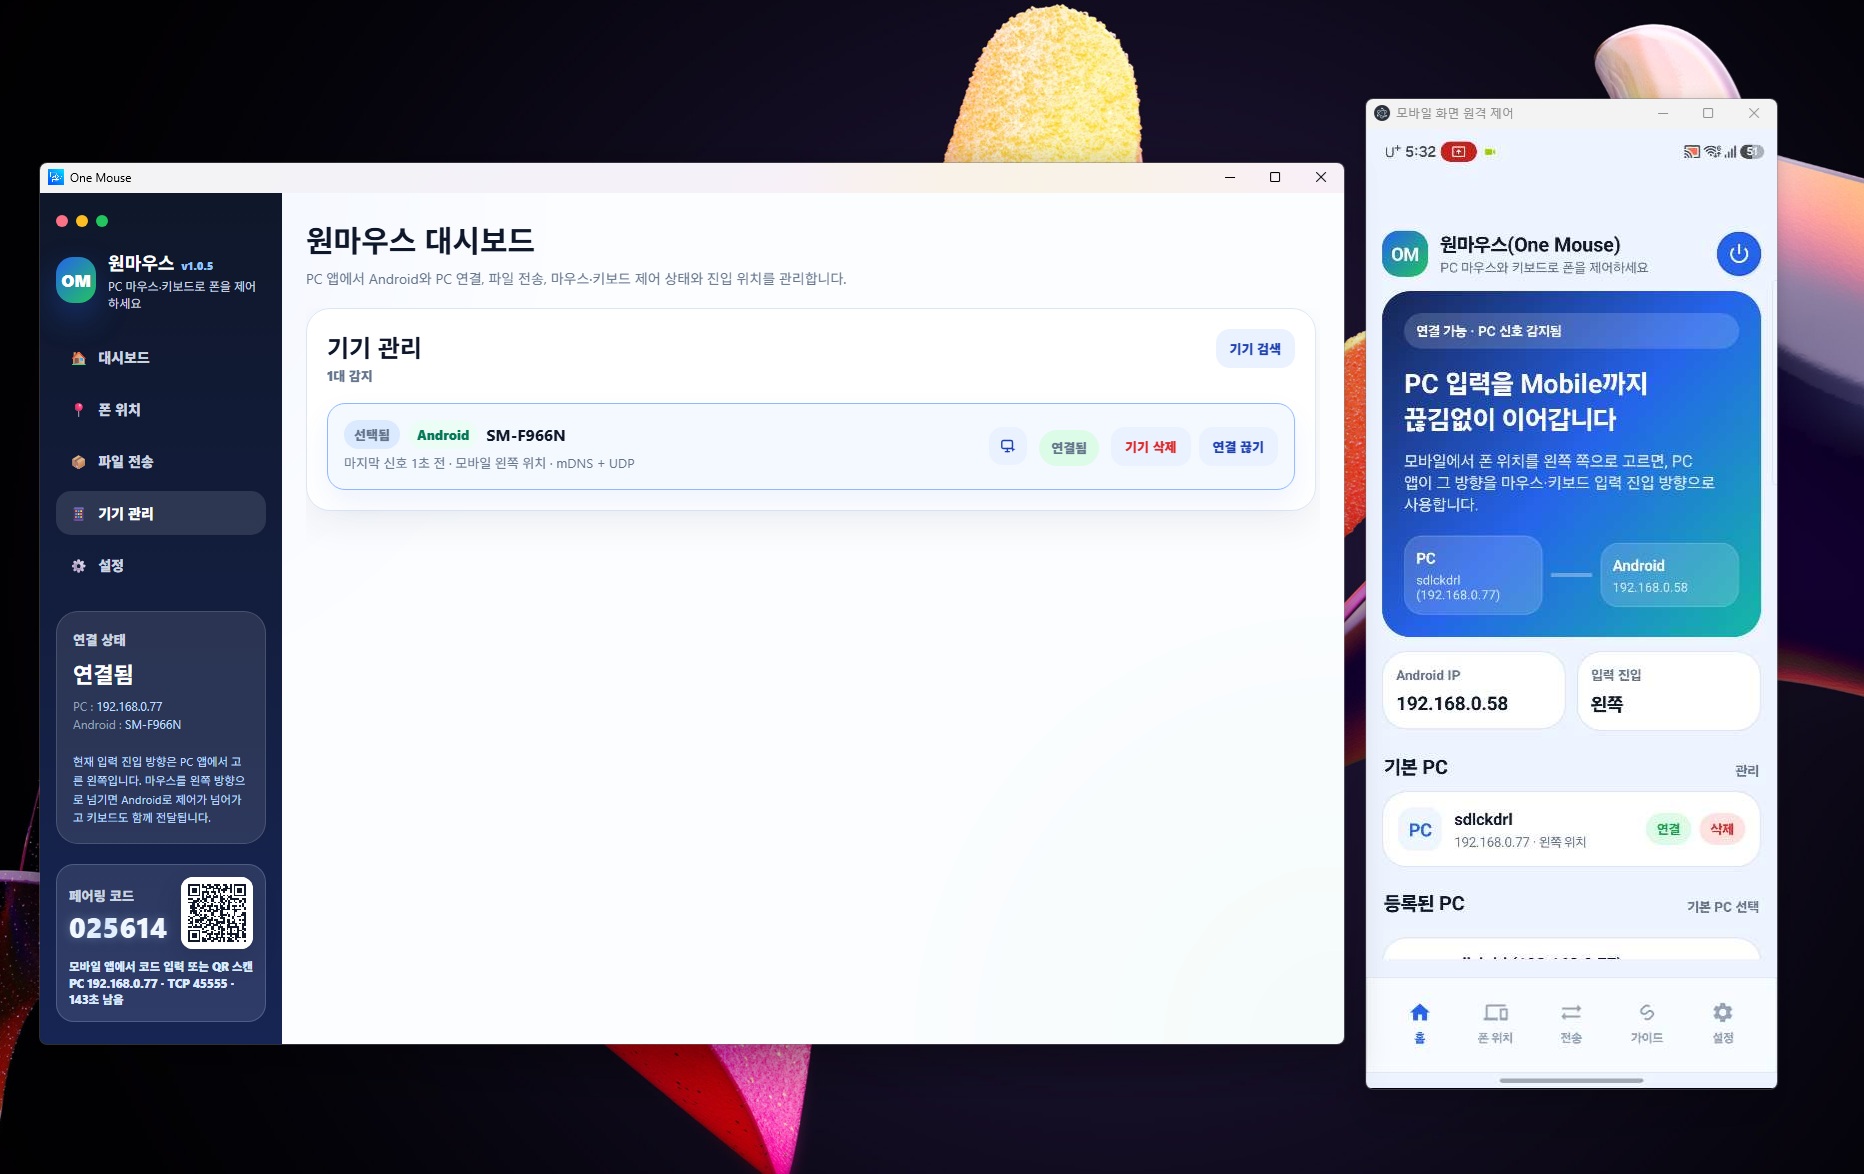
Remote control
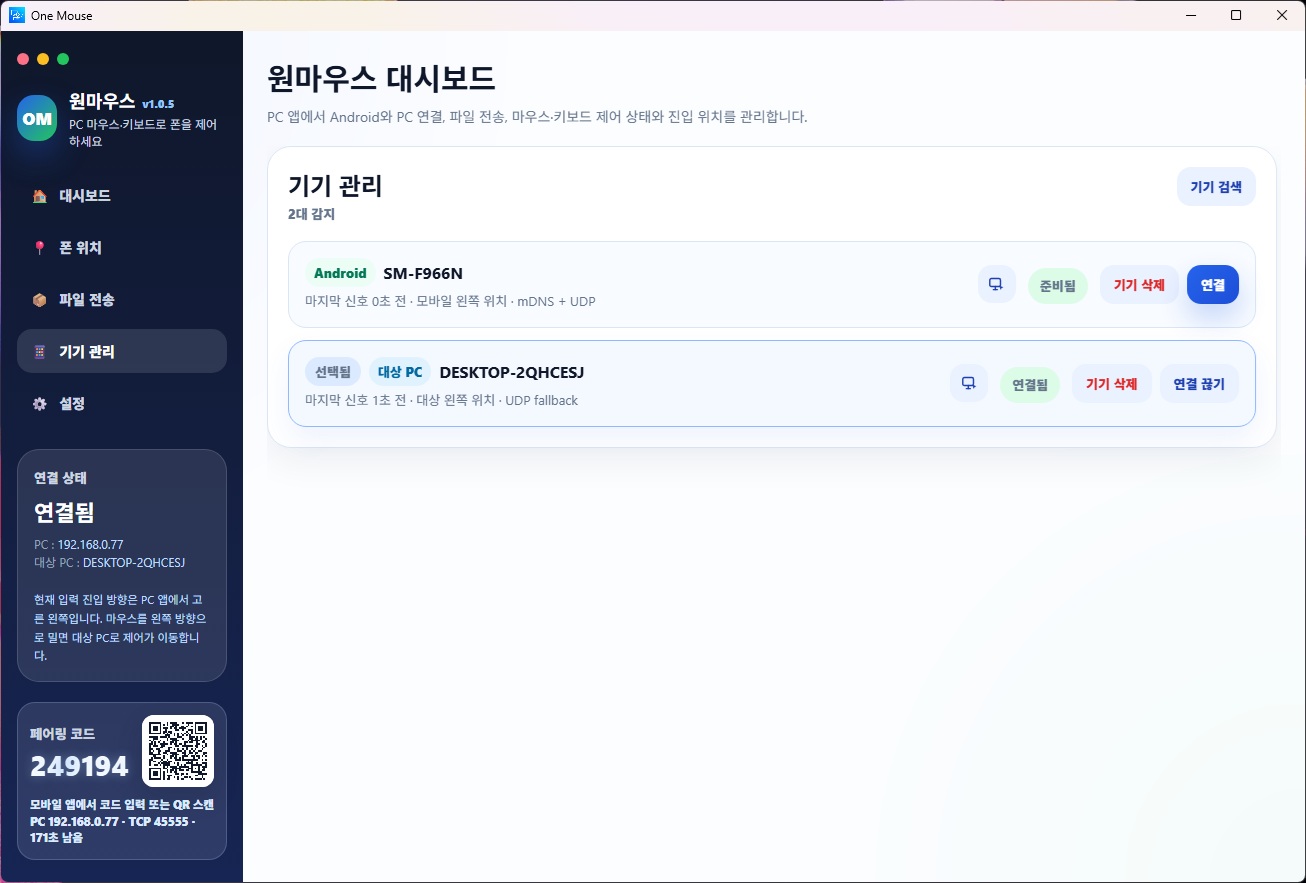
Open remote screens from Devices.
In Devices, tap the remote control icon on the row of a paired Android, and a separate window opens showing the phone's screen. The first time you open it, Android screen capture approval is required.
Controls in an Android window
- Left click, drag, and wheel pass straight through.
- Right click = Back, wheel click = Home.
- Your PC keyboard — including IME and non-Latin input — goes to the phone's current text field.
- If the screen looks blank, check the capture approval pop-up and turn remote control off and on again.
Right-button dragging in Windows remote windows
Open a window from its remote control icon in Devices or with the default Ctrl+Alt+Shift+1~9. Right-button dragging works with gesture extensions configured in the target PC's browser, separately from Android gestures.
The device row and icon
The open remote control window
Android mouse gestures
Hold the right button and draw to navigate.
How to enable gestures, the seven stroke patterns, and support limits.
1. Enable gestures
In Settings → Typing & clipboard, turn on Mouse gestures and choose the apps (off by default). Both PC and Android need a gesture-capable version.
Select All apps to use gestures in apps and on the home screen. Check the support limits
2. Hold, draw, release
Move the PC pointer onto the Android phone or tablet and open a selected app.
- Hold the right mouse button over the page content.
- Draw the directions in order; check the action beside the red trail.
- Release to run the action. The page does not scroll while drawing.
The arrow and vertical gauge show direction and scroll intensity based on stroke length, not your position on the page or an exact distance.
| Gesture | Action |
|---|---|
| ← | BackDraw left to return to the previous page or screen. |
| → | ForwardDraw right to return to a page after going back. |
| ↑ | Scroll upDraw up and release. Longer strokes scroll more; shorter strokes scroll less. |
| ↓ | Scroll downDraw down and release. Longer strokes scroll more; shorter strokes scroll less. |
| ↓ → | Minimize appGo to Home without closing the app. |
| ↑ ↓ | ReloadRefresh the page in a supported browser. |
| ↑ → | Recent appsOpen the recent-app list to choose another app. |
If a gesture does not work
- For direct Android control, not Windows/Mac control or a mirroring window.
- Forward restores browser history. Forward and Reload require browser support.
- Start over page content. A short right-click alone keeps its usual behavior.
- Scroll distance varies by app; Home and the app drawer use just one swipe.
Files & clipboard
Send files from the transfer screen, the Quick Drop zone, or a desktop-to-desktop drag.
- Drop files on the transfer screen or small drop zone to send them to the selected Android, Windows PC, or Mac.
- Windows-to-Windows or Windows-to-Mac over LAN: hold a file, drag it across the arranged screen boundary, and drop it on the target.
- Send from Android to PC
- If it won't start, check the connection status and the selected device.
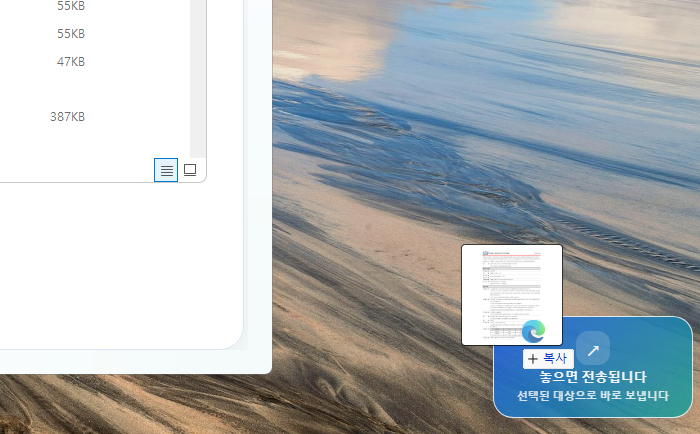
Quick Drop zone
- Press Ctrl+Alt+D to hide or show the drop zone.
- Its position and state are saved in the PC app.
The Quick Drop zone screen
Mobile to PC
Send files and selected text from your phone to your PC.
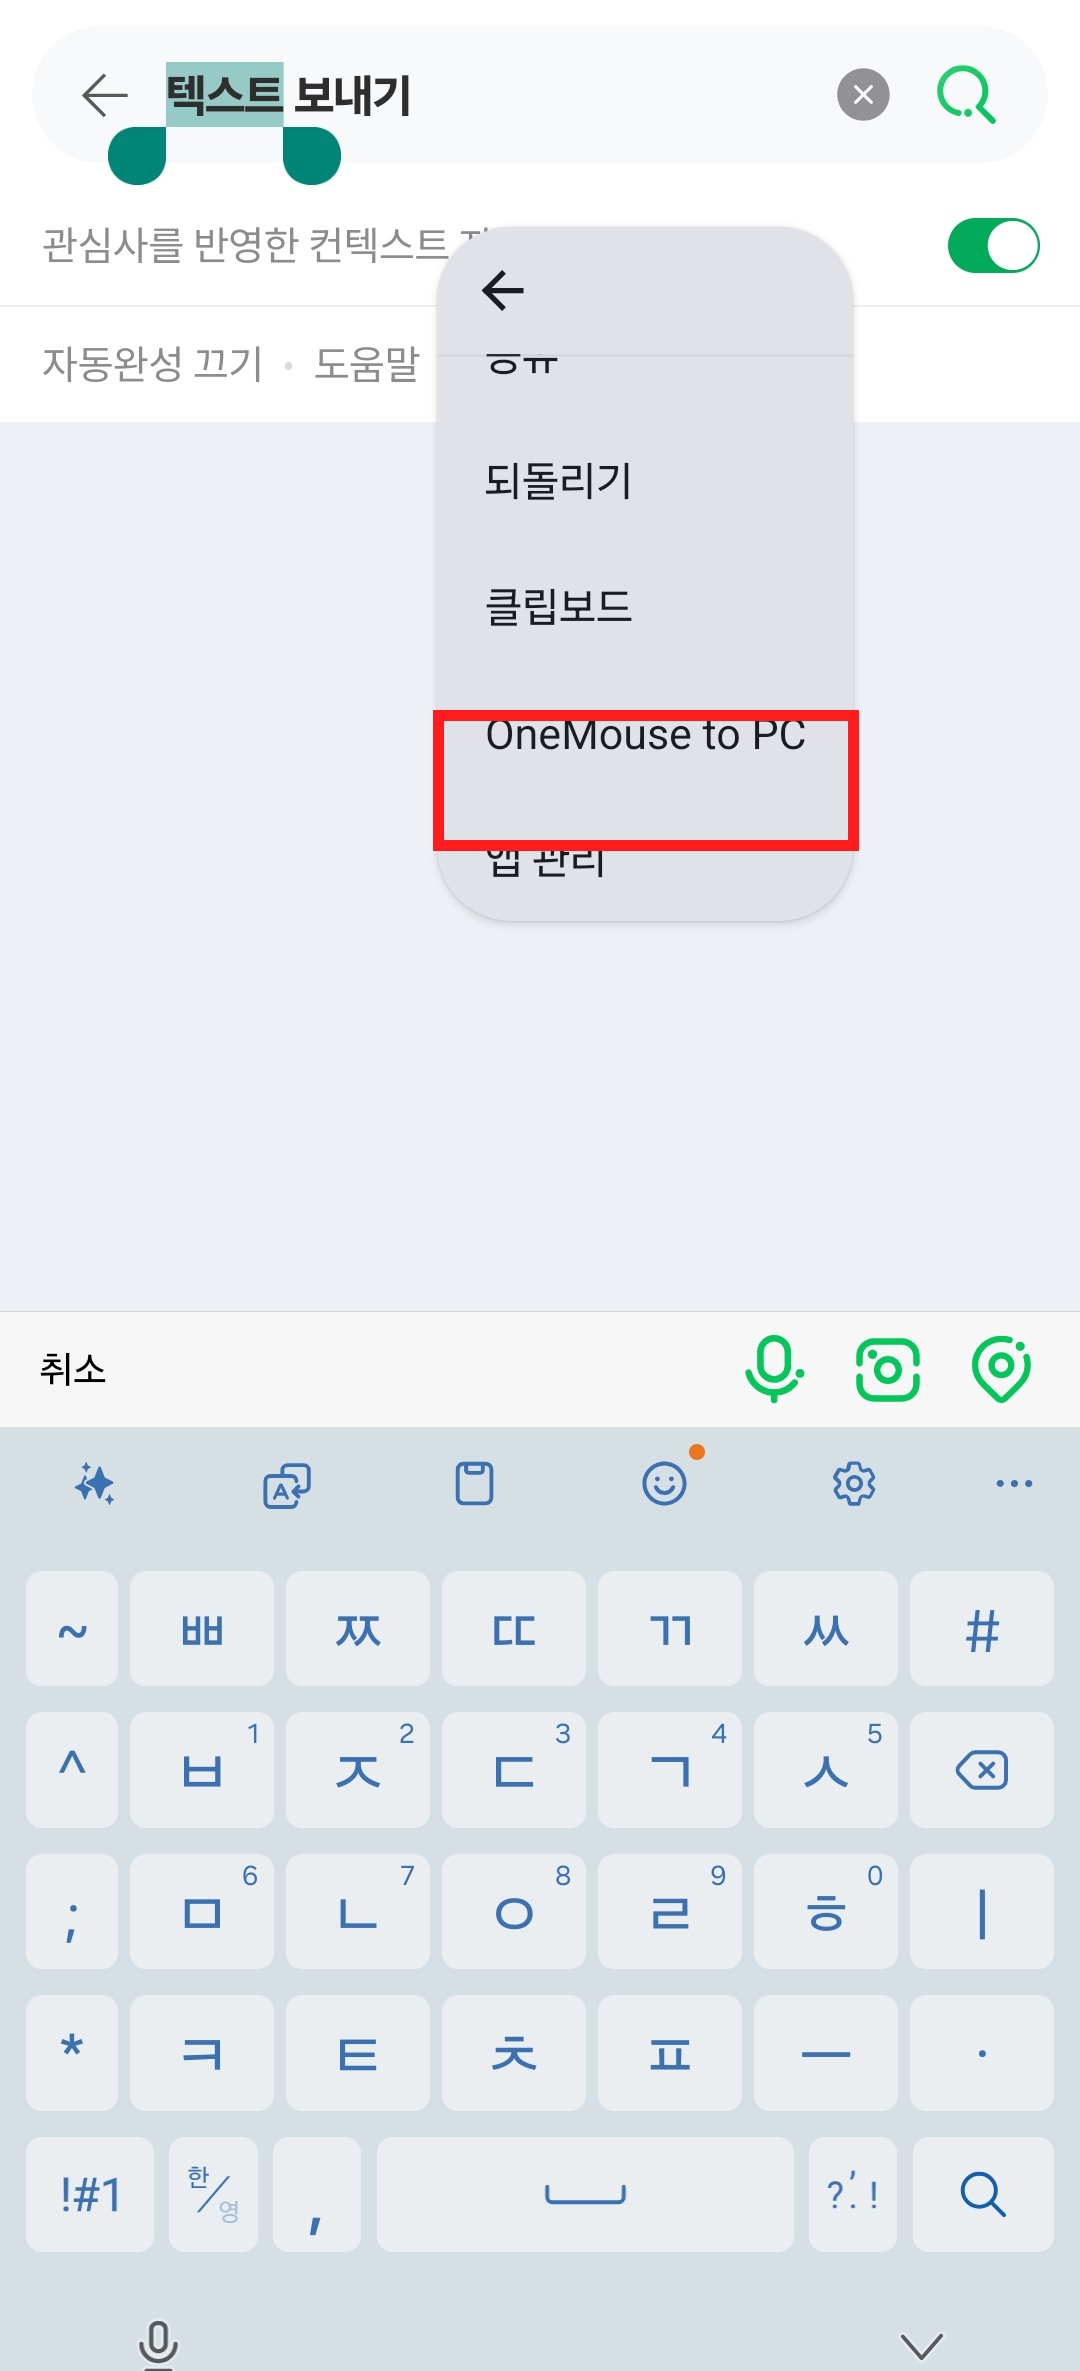
For LAN transfers, choose the default PC on the mobile app's home screen and check that it is paired and connected. Send files from the transfer tab or Android's share menu, and send text through OneMouse to PC in the selection menu.
Send a file
- In the mobile app's Transfer tab, tap Choose files and send to PC.
- Select the files and they are sent to the currently selected PC.
- From a photo or document app, you can also choose Share and select OneMouse.
Send text
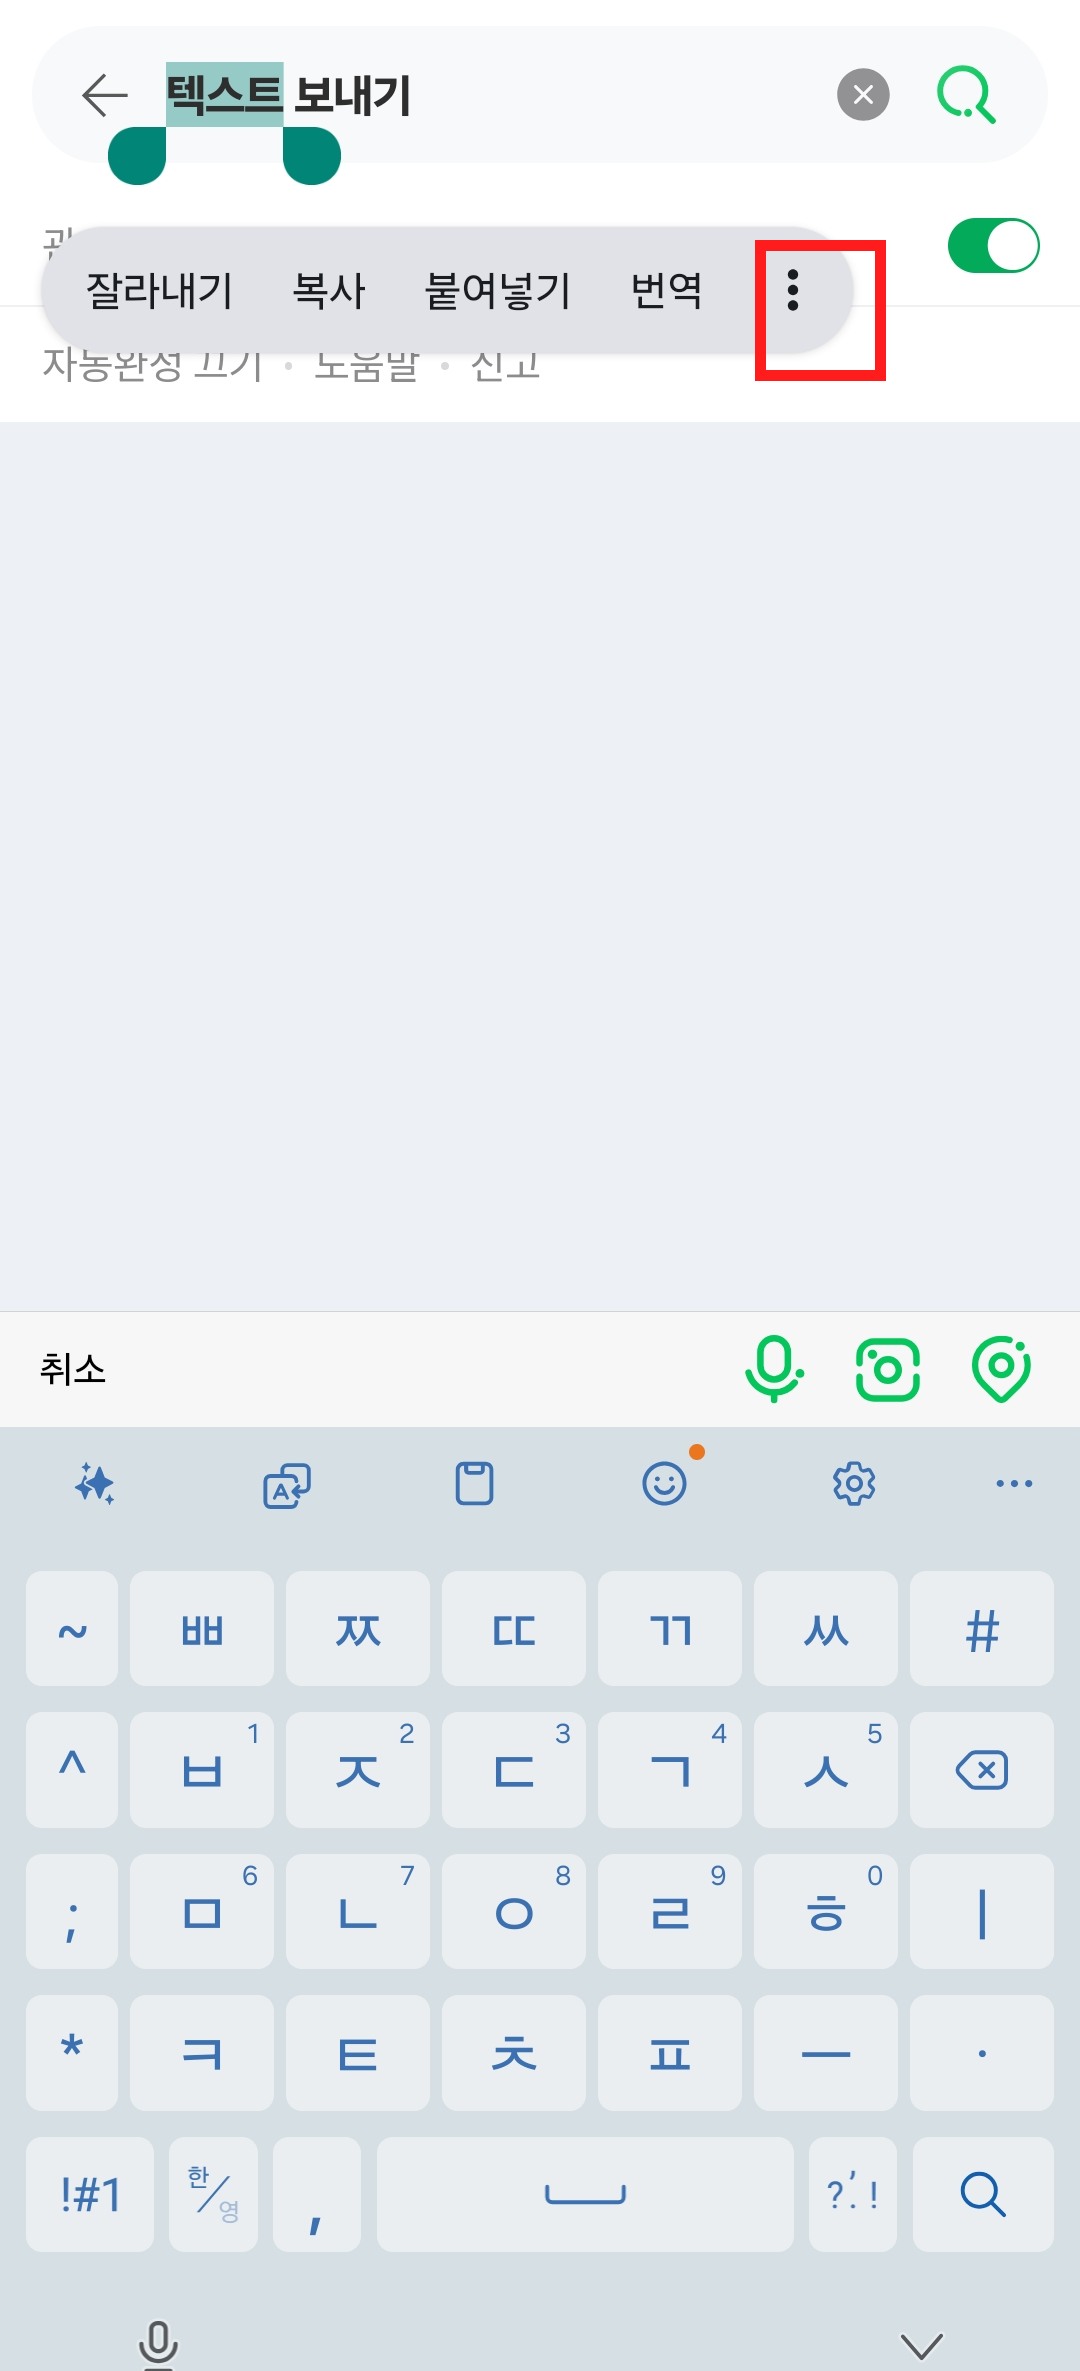
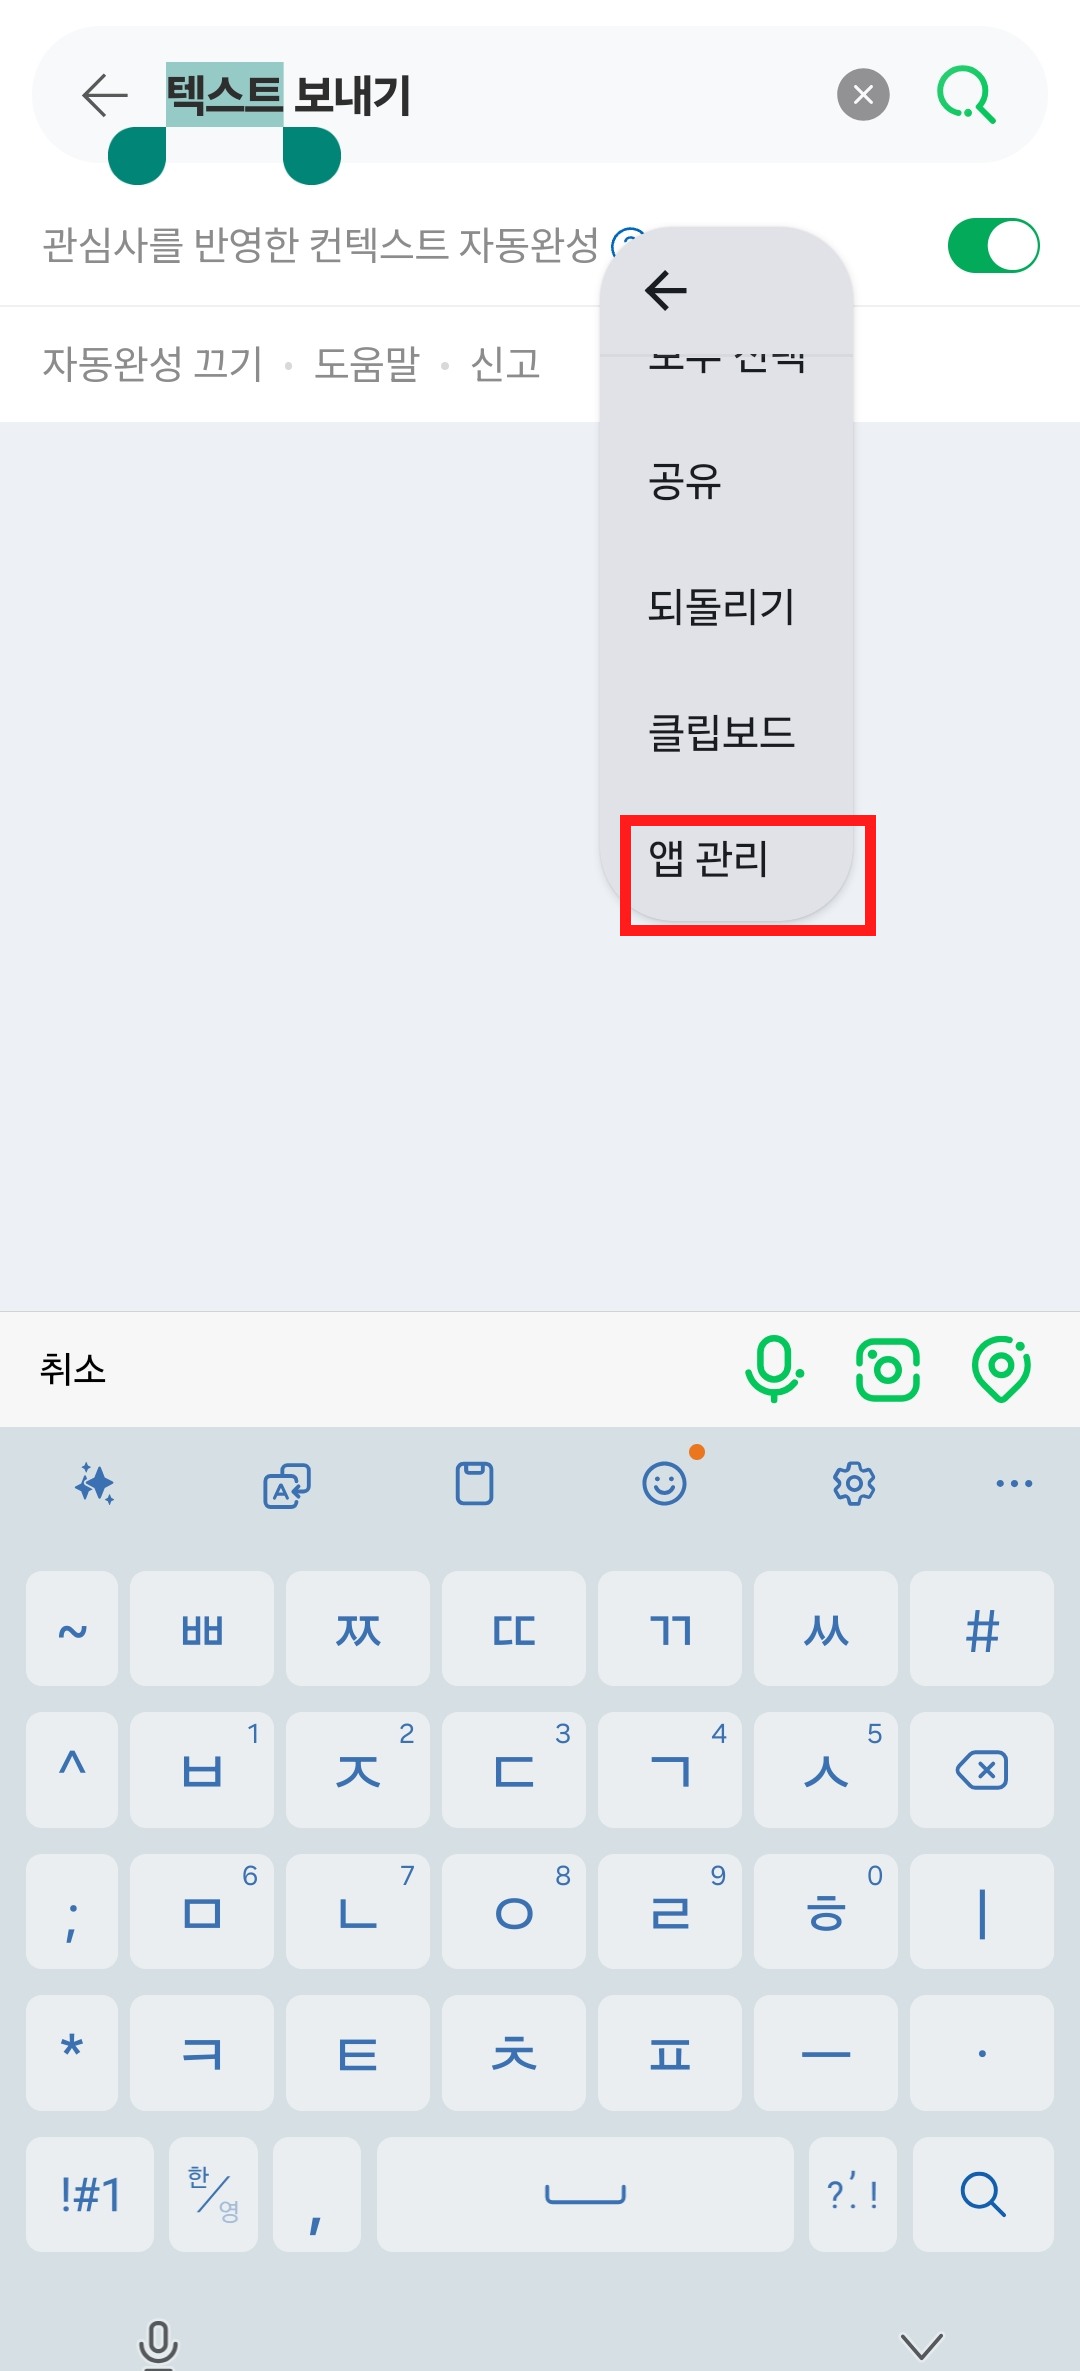
- Long-press text on Android, select it, then open More.
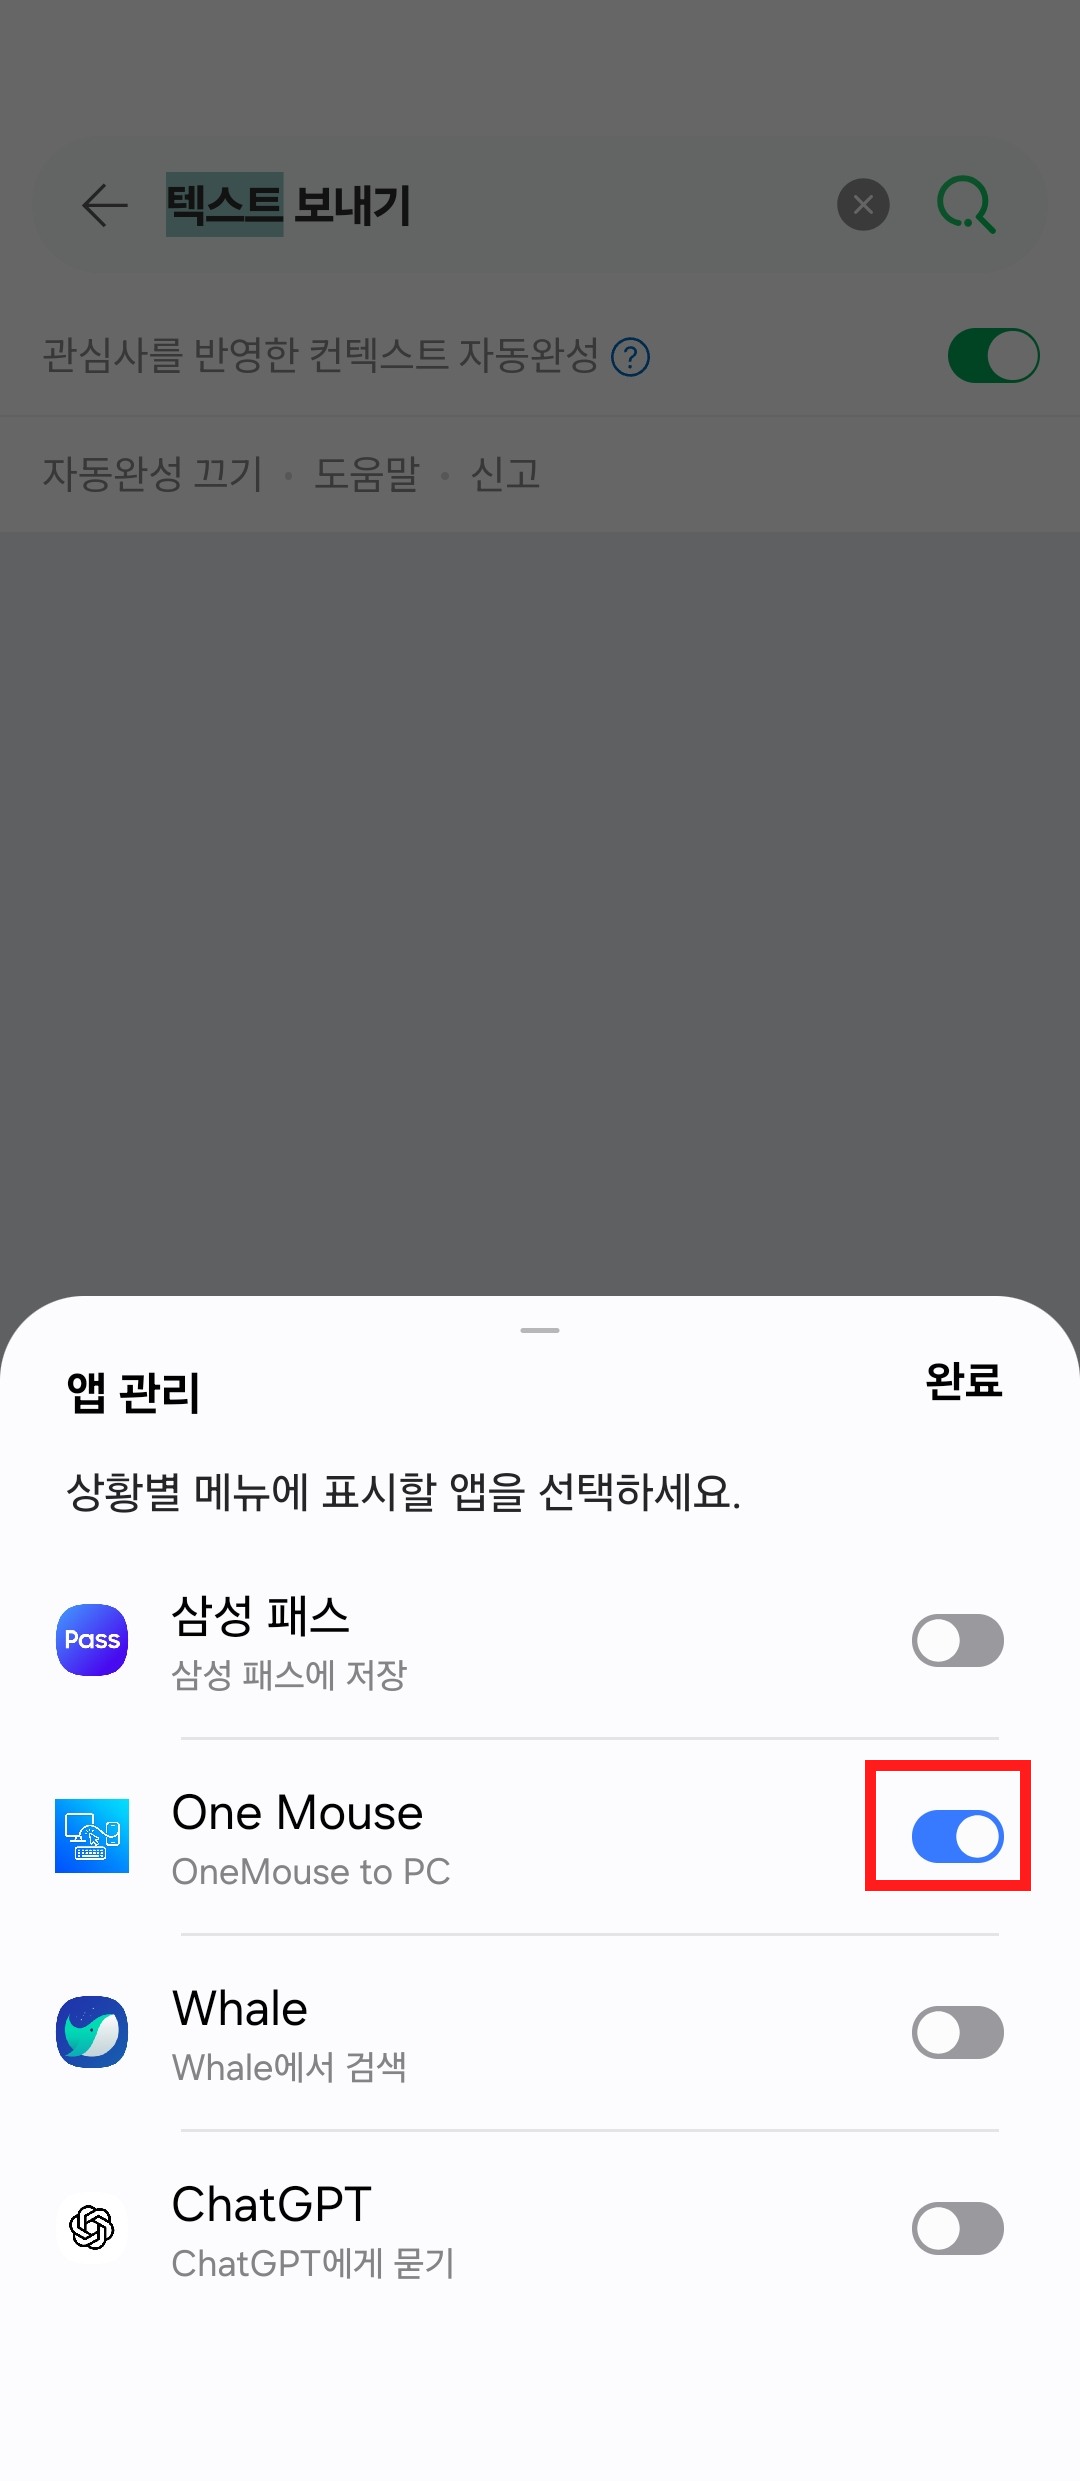
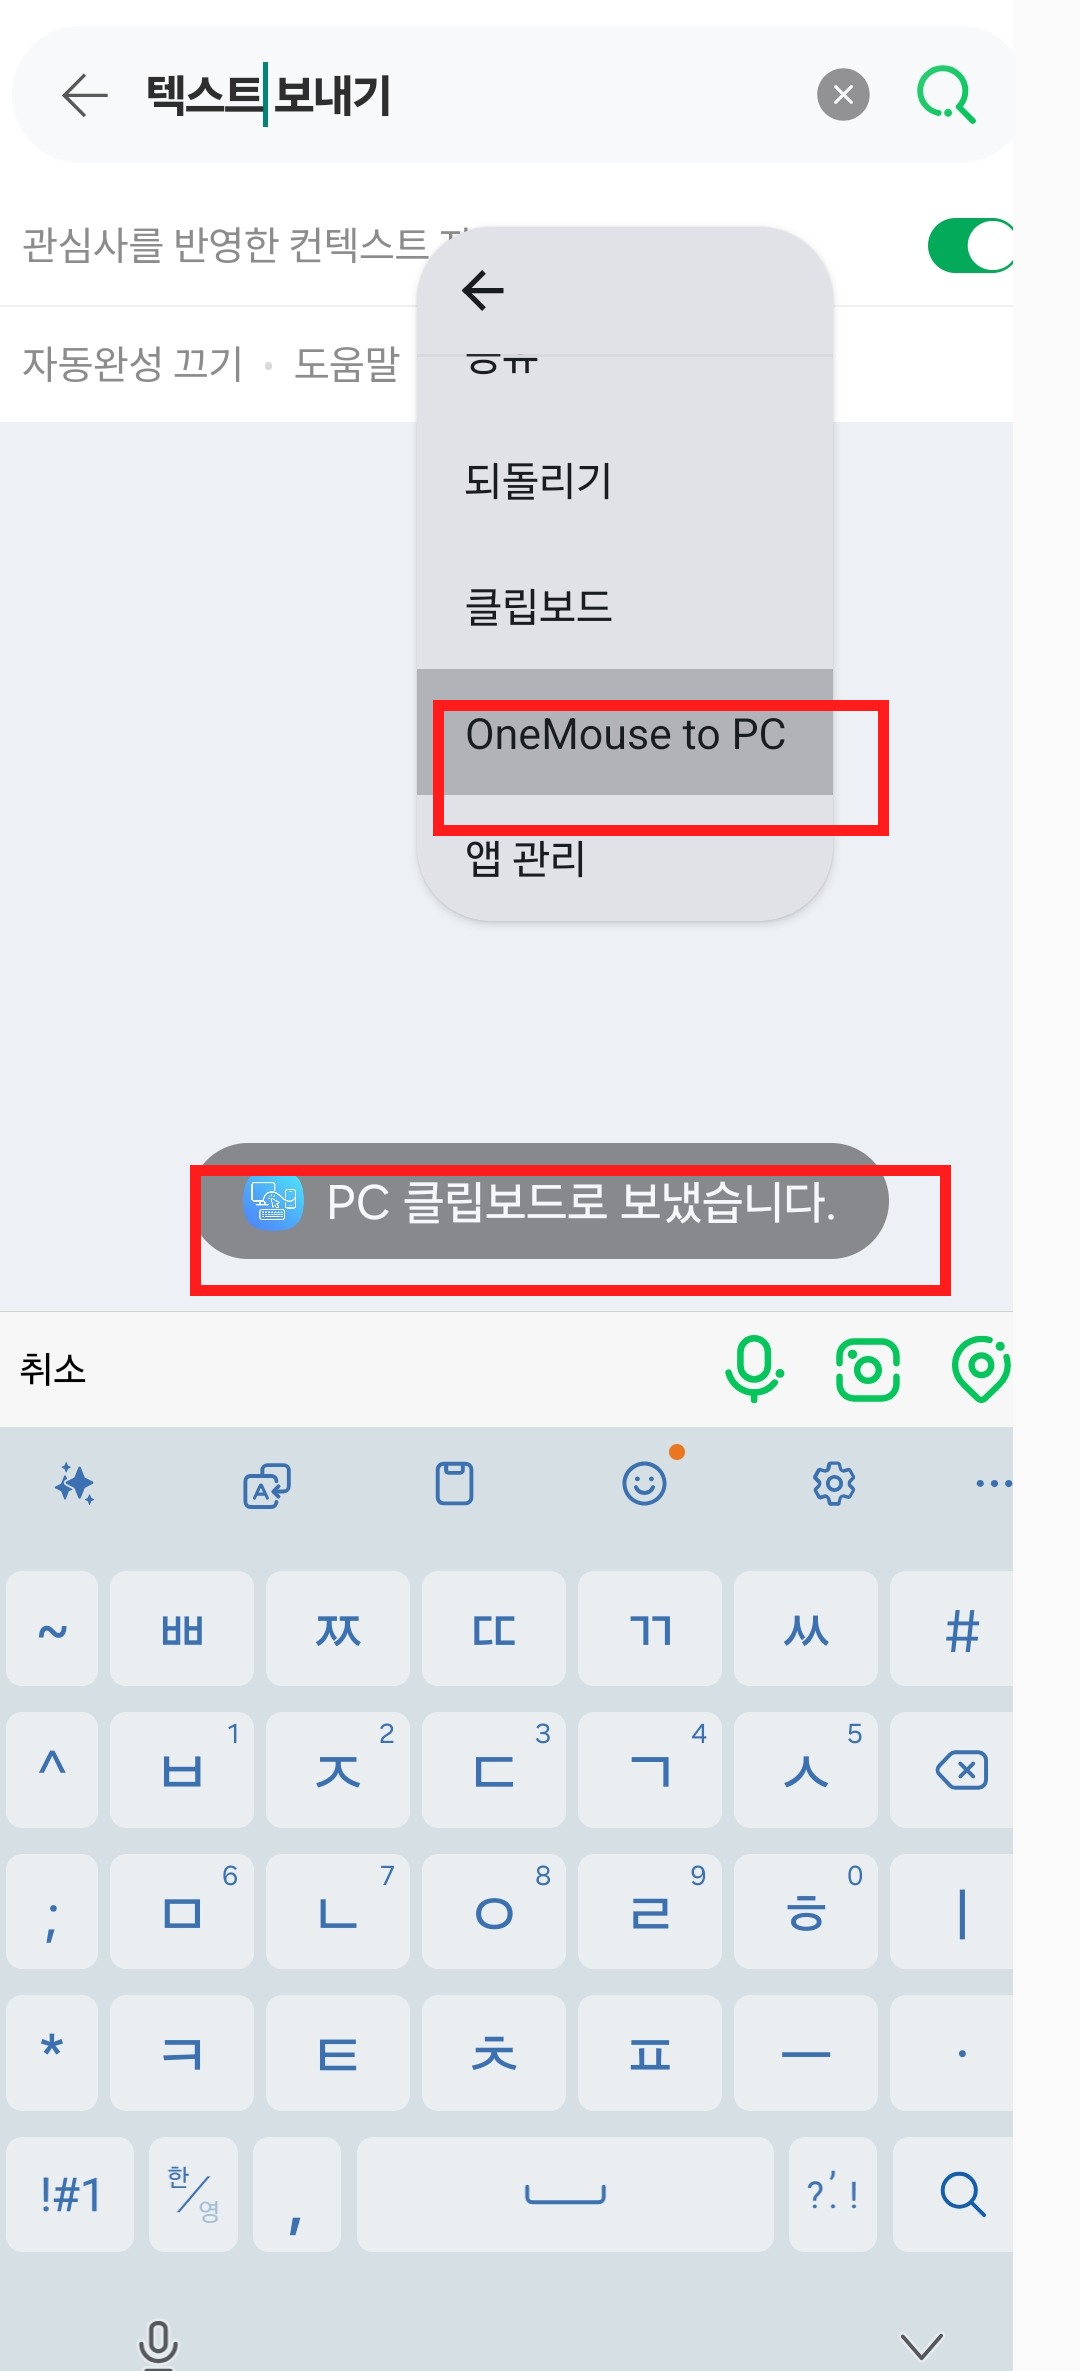
- Tap OneMouse to PC to copy it to the PC clipboard.
- If it is missing the first time, turn on OneMouse once in app management, then select it again.
Find received files on the PC
In PC Settings → General → File transfer → Received file location, use Change folder to choose the destination and Open folder to view it. This is available on both main and sub PCs.
See the text-transfer screensHow to enable and use OneMouse to PC from Android's selection menu.
Notifications & replies
Read phone notifications and reply when supported.
Receive notifications and view history
In the Android app, enable Send notifications to PC, allow notification access, and select the apps to relay. On the main PC, enable device notifications in Settings → Notifications.
The same screen shows history and retention settings. More about notifications
Reply to a live notification
Reply appears when PC and Android support replies and the original phone notification offers a free-text reply. Type your reply and choose Send or Ctrl+Enter to send through the original phone app (Enter adds a line break).
Number shortcuts
Connect instantly with the number from your device list.
Ctrl + Alt + 1~9
- By default, the first 9 LAN devices in the main PC device list get Ctrl+Alt+1~9. See shortcut settings to change the keys.
- Press a number to connect to that device.
- Press the same number again to release input control of the device you are currently controlling.
Auto-reconnect
- When on, the PC app reconnects automatically when your last device reappears or when only one device is ready.
Change device order and shortcut numbers
With at least two LAN devices on the main PC, choose Devices → Edit order. Drag the handle or use ↑/↓; changes save automatically, then choose Done. Connection and remote-window shortcut numbers follow the same order.
Bluetooth
You can also connect over Bluetooth, without a router.
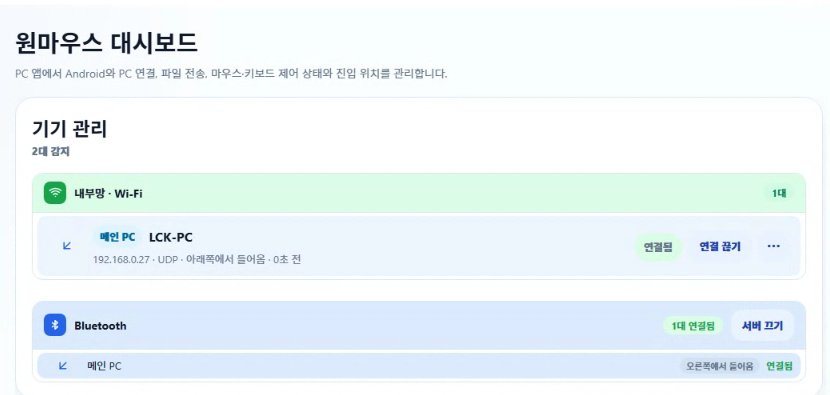
Windows↔Android and Windows↔Windows can exchange input, clipboard, and files directly over Bluetooth.
Great when
- You're in a room, outdoors, or in a car with no shared Wi-Fi
- Guest Wi-Fi or a firewall blocks device discovery
- You mostly do light keyboard and clipboard work
Good to know
- Use Wi-Fi or LAN for large files and mobile remote screens.
- Mac Bluetooth is beta (enable in app settings; off by default). LAN is officially supported, and Mac screen/window sharing is LAN-only.
Connection order
Turn on Bluetooth mode in the Android settings tab
Pair the phone once in Windows Bluetooth settings
The PC app auto-connects → shown in Devices
Use input, clipboard, and files just like Wi-Fi
The Bluetooth target device screen
Another PC
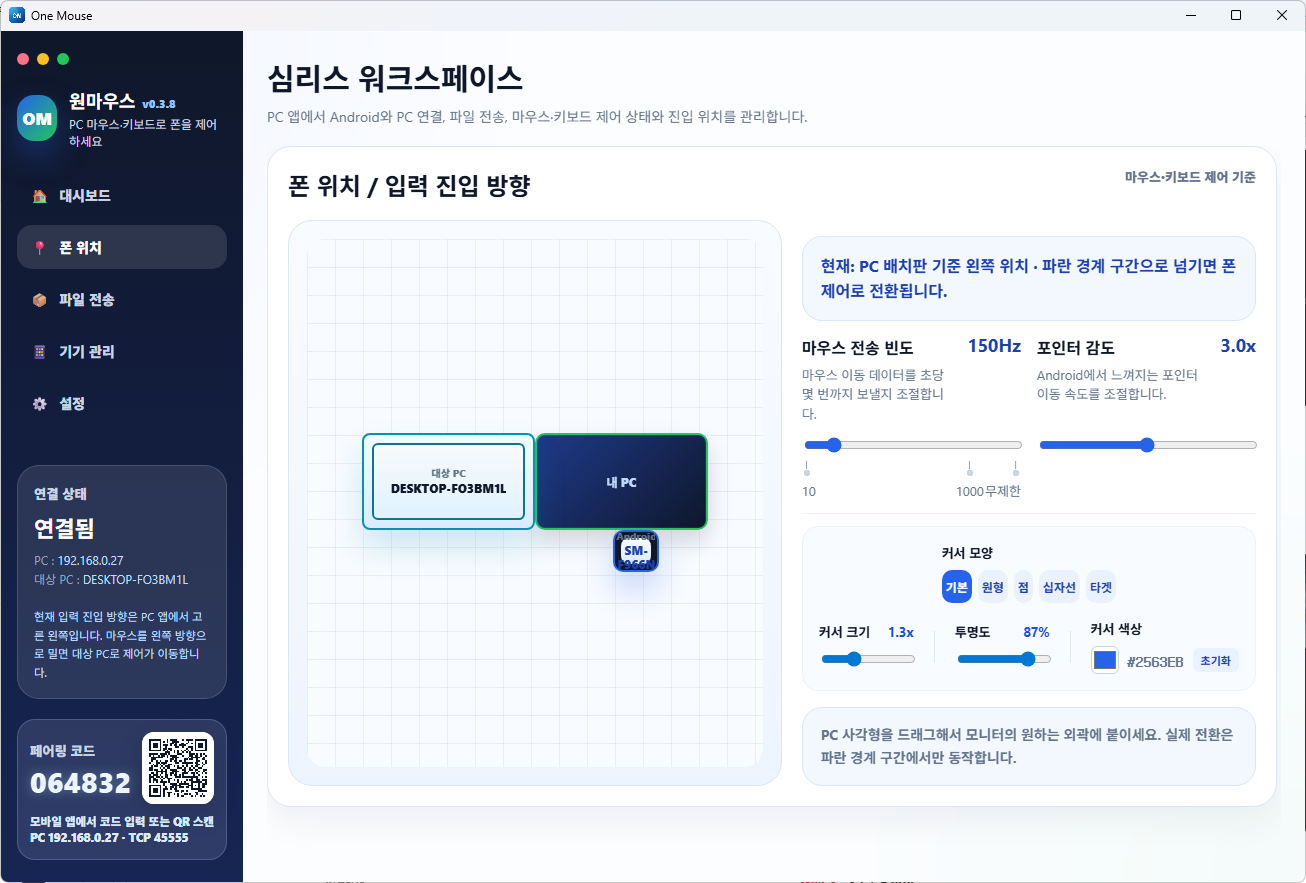
Link another Windows PC in this order: Settings · Devices · arrangement.
Connecting
- Choose the Windows PC that will start and manage the connection.
- Pair the other Windows PC to add it to Devices.
- In the layout editor, place the other PC where it really sits.
- Move the mouse in that direction to control the other PC, and exchange files by dragging across the boundary.
The arrangement screen
Mac · Public support
Connect an Apple Silicon Mac running macOS 13+ from Windows.
Install the public DMG on the Mac, then start and manage the LAN connection from OneMouse on Windows. Follow these five steps.
Put Windows and Mac on the same local network
Run OneMouse on Windows 10/11 and on the Mac, with both computers connected to the same Wi-Fi or LAN. Connections are started and managed from Windows.
Allow the Mac permissions
Allow Accessibility so the Mac can perform received mouse and keyboard input. On macOS 15+, also allow Local Network for discovery; macOS 13/14 may not show this item.
Select the Mac in Windows
Open Devices in the Windows app and select the detected Mac.
Enter the Mac's 6-digit code
Enter in Windows the 6-digit pairing code displayed by the Mac, then confirm the pairing.
Arrange the Mac and cross over
Place the Mac beside the Windows display in the arrangement editor. Move the cursor across that edge to control it and exchange files and clipboard content in both directions.
Optional LAN screen sharing
Screen & System Audio Recording permission is needed only when you choose to view or control the Mac's display from Windows. OneMouse does not capture system audio.
Mac Bluetooth
Mac Bluetooth is available as a beta: enable it in the Mac app settings (off by default). LAN remains the officially supported path, and screen or window sharing is LAN-only.
Permissions
Each platform asks only for the permissions its features need.
Android input needs Accessibility Service; Mac input needs Accessibility. Viewing an Android or Mac remote screen also requires screen capture or recording approval.
Keyboard shortcuts and when they apply.
These PC shortcuts are defaults. In PC Settings → Shortcuts, you can change each combination, turn individual actions off, or disable all shortcuts. Use your saved combination if you have changed it.
Windows app defaults
| Default shortcut | Action and conditions |
|---|---|
| Ctrl+Alt+1~9 | Main PC: connect input control to the matching device in the list. Press the same number again to release the device you are currently controlling. |
| Ctrl+Alt+Shift+1~9 | Main PC: open the matching remote window or bring an existing window forward. Pressing it again does not close the window. It uses the same LAN device numbers as connection shortcuts; Bluetooth devices are excluded from numbering. |
| Ctrl+Alt+D | Show / hide the Quick Drop zone. |
| Ctrl+Alt+S | Select an area on the Windows PC, Mac, or Android device you are controlling and receive it on the main PC. With no remote device under control, capture this PC. Both apps must support the feature, and the target needs capture permission. |
| Ctrl+Alt+V | Main PC: copy a verification code while its phone notification is visible on the PC. Enable phone notification relay first. |
| Ctrl+V | Receive and paste shared files copied on another PC. With no shared files waiting, ordinary paste remains available. |
| Ctrl+Alt+Backspace | Main PC: immediately return the cursor to the center of your own monitor while controlling another device. |
While directly controlling Android
These are input combinations sent to Android, separate from the PC app shortcut settings above. Text editing depends on support in the target app and text field.
| Default shortcut | Action and conditions |
|---|---|
| PrintScreen | Android 11+: capture the phone screen during direct control and send it to the PC. Accessibility permission is required. |
| Alt+Shift+↑ / Alt+Shift+↓ | Raise / lower Android screen brightness. Requires permission to modify system settings. |
| Alt+↑ / Alt+↓ | Raise / lower Android media volume. |
| Alt+Tab / Alt+Shift+Tab | Switch recent apps / cycle in reverse. Release Alt to enter the selected app. |
| Ctrl+A / Ctrl+C / Ctrl+X / Ctrl+V | Select all / copy / cut / paste in a supported text field. |
| Ctrl+Insert / Shift+Insert / Shift+Delete | Copy / paste / cut in a supported text field. |
| Ctrl+Z | Undo in apps and text fields that support it. |
Using a Windows keyboard to control a Mac
The default Windows shortcut mapping sends Ctrl as Command and Alt as Option. You can switch to native Mac modifier mapping in the Mac app keyboard settings. This does not mean replacing Ctrl with Command in the Windows app shortcuts above.